
In part 1 of the tutorial, we set up the game scene, added a couple of labels to keep track of game status , amount of time elapsed and number of moves. And we made the timer start counting to give a real game feel. Now we’ll build on that, add some tiles to the scene, and some game logic to the slider puzzle game . By the end of this tutorial, you’ll learn more about scaling sprites, positioning and handling touch response.
Generating Tiles
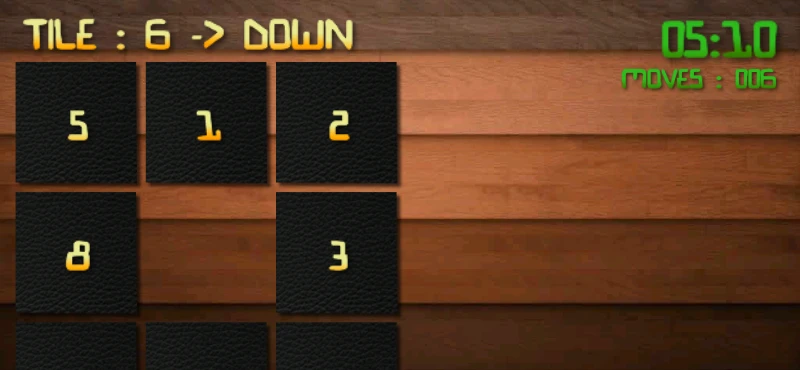
First, we will need to create a new method (under the scene() method) to generate the slider puzzle tiles and arrange them on the screen in a matrix manner. Technically, we can generate any amount of tiles we want e.g 3 X 3 = 9 tiles , 4 X 4 = 16 tiles ,4 X 5 = 20 tiles etc. We would just need to adjust the height of the tile itself to fit the screen width and height. The larger the number of tiles, the smaller our tile height will be. For this tutorial, we will use a 3 X 3 matrix of 9 tiles as shown in the picture above.
Before we proceed, we will need some global variables to be added at the top of our class The rational behind defining variables at the top of your class is to give them a global scope (i.e we can modify the variable from any method within our code). Some variables such status label which we will be updating from different methods will also be initialized at the top of our class for easy reference. An error will arise after you initialize this at the top, you may remove the second instance of initialization and simply use the variable.
Add the following variables to the top of your class.
private static final int TILE_NODE_TAG = 23;  //keeps track of each tile on the scene
private static   float TILE_SQUARE_SIZE = 3;  //the height of each of our tiles
private static final int NUM_ROWS = 3;    //Number of rows our game would support
private static final int NUM_COLUMNS = 3;  // Number of colums supported
private int toppoint = 0 ;     //top cordinate from which we would start laying out our tiles
private int topleft = 0;
CCBitmapFontAtlas statusLabel ;    //status label
private static CGPoint emptyPosition ;   //keeps track of the position of the empty slot on our game
float generalscalefactor = 0.0f ;     //a scaling factor to ensure our game looks good on diff screen sizes
private int moves = 0 ;                //number of moves
private Context appcontext;             //a reference to the android context variable
public static boolean gameover = false ;    //track if the game has been solved
Code snippet to generate tiles is given below, add the method to your class.
public void generateTiles(){

		//We create a Node element to hold all our tiles
		CCNode tilesNode = CCNode.node();
		tilesNode.setTag(TILE_NODE_TAG);
		addChild(tilesNode);
		float scalefactor ;   // a value we compute to help scale our tiles
		int useableheight  ;
		int tileIndex = 0 ;

		//We attempt to calculate the right size for the tiles given the screen size and
		//space left after adding the status label at the top
		int nextval ;

		int[] tileNumbers = {5,1,2,8,7,6,0,4,3};  //random but solvable sequence of numbers

		//TILE_SQUARE_SIZE = (int) ((screenSize.height  *generalscalefactor)/NUM_ROWS) ;
		int useablewidth = (int) (screenSize.width - statusLabel.getContentSize().width*generalscalefactor ) ;
		useableheight =  (int) (screenSize.height  - 40*generalscalefactor - statusLabel.getContentSize().height * 1.3f*generalscalefactor) ;

		TILE_SQUARE_SIZE = (int) Math.min((useableheight/NUM_ROWS) , (useablewidth/NUM_COLUMNS)) ;

		toppoint = (int) (useableheight  - (TILE_SQUARE_SIZE / 2) + 30*generalscalefactor)   ;
		scalefactor = TILE_SQUARE_SIZE / 150.0f ;

		topleft = (int) ((TILE_SQUARE_SIZE / 2) + 15*generalscalefactor) ;

		CCSprite tile = CCSprite.sprite("tile.png");
		//CCSprite tilebox = CCSprite.sprite("tilebox.png");

		for (int j = toppoint ; j > toppoint - (TILE_SQUARE_SIZE * NUM_ROWS); j-= TILE_SQUARE_SIZE){
			for (int i = topleft ; i < (topleft - 5*generalscalefactor) + (TILE_SQUARE_SIZE * NUM_COLUMNS); i+= TILE_SQUARE_SIZE){ 				if (tileIndex >= (NUM_ROWS * NUM_COLUMNS)) {
					break ;
				}
				nextval = tileNumbers[tileIndex ];
				CCNodeExt eachNode =  new  CCNodeExt();
				eachNode.setContentSize(tile.getContentSize());
				//
				//Layout Node based on calculated postion
				eachNode.setPosition(i, j);
				eachNode.setNodeText(nextval + "");

				//Add Tile number
				CCBitmapFontAtlas tileNumber = CCBitmapFontAtlas.bitmapFontAtlas ("00", "bionic.fnt");
				tileNumber.setScale(1.4f);

				eachNode.setScale(scalefactor);
				eachNode.addChild(tile,1,1);
				tileNumber.setString(nextval + "");
				eachNode.addChild(tileNumber,2 );

				if( nextval != 0){
					tilesNode.addChild(eachNode,1,nextval);
				}else {
					emptyPosition = CGPoint.ccp(i, j);
				}

				//Add each Node to a HashMap to note its location
				tileIndex++;
			}
		}

	}
The code above has been commented to give a clear idea of whats happening. To summarize whats being done, first we calculate the appropriate tile height (TILE_SQUARE_SIZE) to use given available screensize, calculate the appropriate starting point to lay out our tiles (toppoint) and then use two for loops to position of our tiles horizontally and vertically (x and y cordinates).
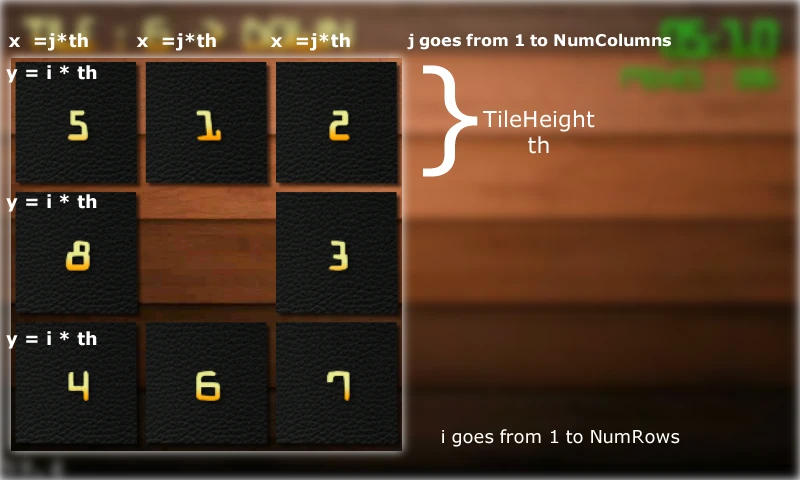
Note about generating the tile numbers . We generate the number sequence our tiles like so
int[] tileNumbers = {5,1,2,8,7,6,0,4,3};
When we display the tiles, 0 represents the empty tile spot. Also, the randomness of the numbers generated should follow a certain order else the puzzle will not be solvable :). You can learn more about that here .
Finally, we use a custom Node Class CCNodeExt which has an attribute called nodetext. This helps us keep track of the node and we’ll use that later on. The CCNodeExt Class is given below, create the CCNOdeExt.java class and add it to your src folder in your project.
/**
	 *
	 * Author:  Victor Dibia
	 * Date last modified: Feb 10, 2012
	 * Model tiles with extra field NodeText
	 */

package com.example.puzzlegame;

import org.cocos2d.nodes.CCNode;

public class CCNodeExt extends CCNode{
	public  String nodeText ;

	public CCNodeExt(){
		super();

	}

	public void setNodeText(String nText){
		this.nodeText = nText;
	}

	public String getNodeText(){
		return this.nodeText ;
	}

}
Catching User Touch/Slide Action
In order to get touch response on our layer, we need to enable touch response reception on our layer. In Cocos2D,this is done by adding the following line in the layer default constructor ( GameLayer() in our case).
this.setIsTouchEnabled(true);
Add this inside the GameLayer() method.
Now, in order to slide our tiles, we employ a bit of Math. Remember, we laid out each tile using some mathematical calculation, thus we know the exact square cordinates that each tile falls within. Since we can now accept touch response, we can capture the exact position on the layer that the user has touched and also tell if it falls within any of our tile boxes. In Cocos2D, several method can be used to track user touch response. the ccTouchesBegan method is used to track when each touch event begins.
Paste the ccTouchesBegan snippet below as a method in your Gamelayer class
@Override
	public boolean ccTouchesBegan(MotionEvent event)
	{
		//Get touch location cordinates
		CGPoint location = CCDirector.sharedDirector().convertToGL(CGPoint.ccp(event.getX(), event.getY()));
		CGRect spritePos ;

		CCNode tilesNode = (CCNode) getChildByTag(TILE_NODE_TAG) ;
		//ccMacros.CCLOG("Began", "Began : " + location.x + " :  "  );

		//We loop through each of the tiles and get its cordinates
		for (int i = 1 ; i < (NUM_ROWS * NUM_COLUMNS); i++){
			CCNodeExt eachNode = (CCNodeExt) tilesNode.getChildByTag(i) ;

			//we construct a rectangle covering the current tiles cordinates
			spritePos = CGRect.make(
					eachNode.getPosition().x - (eachNode.getContentSize().width*generalscalefactor/2.0f),
					eachNode.getPosition().y - (eachNode.getContentSize().height*generalscalefactor/2.0f),
					eachNode.getContentSize().width*generalscalefactor   ,
					eachNode.getContentSize().height*generalscalefactor   );
			//Check if the user's touch falls inside the current tiles cordinates
			if(spritePos.contains(location.x, location.y)){
				//ccMacros.CCLOG("Began Touched Node", "Began touched : " + eachNode.getNodeText());
				slideCallback(eachNode); // if yes, we pass the tile for sliding.

			}
		}

		return true ;
	}
If we successfully get a hit, we call the slideCallback method below which determines which direction the touched tile should slide to. A tile that has no space next to it will not move at all .
See Also : How to Create a Sliding Menu in Cocos2d for Android
Basically the function is passed a reference to the slide that has been touched. Then we have 4 if statements that checks if the empty spaced is at the right , left , top or bottom of the touched tile. We do this because we keep track of the position of the empty spot using the emptyPosition variable. We then pass this direction found to the SlideTile function (coming up next) which slides the tile and updates the emptyPosition variable! Cunning huh ? 🙂
	public void slideCallback(CCNodeExt thenode) {

		CGPoint nodePosition = thenode.getPosition();

		//Determine the position to slide the tile to .. ofcourse only if theres an empty space beside it

		if((nodePosition.x - TILE_SQUARE_SIZE)== emptyPosition.x && nodePosition.y == emptyPosition.y){
			slideTile("Left", thenode,true);
		}else if((nodePosition.x + TILE_SQUARE_SIZE) == emptyPosition.x && nodePosition.y == emptyPosition.y){
			slideTile("Right", thenode,true);
		}else if((nodePosition.x)== emptyPosition.x && nodePosition.y == (emptyPosition.y  + TILE_SQUARE_SIZE )){
			slideTile("Down", thenode,true);
		}else if((nodePosition.x )== emptyPosition.x && nodePosition.y == (emptyPosition.y  - TILE_SQUARE_SIZE)){
			slideTile("Up", thenode,true);
		}else{
			slideTile("Unmovable", thenode,false);
		}

	}
The actual sliding is done by the SlideTile method below
	public void slideTile(String direction, CCNodeExt thenode, boolean move){
		CCBitmapFontAtlas moveslabel = (CCBitmapFontAtlas) getChildByTag(MOVES_LABEL_TAG);

		if(move && !gameover){
			//  Increment the moves label and animate the tile
			moves ++ ;
			moveslabel.setString("Moves : " + CCFormatter.format("%03d", moves ));

			//Update statuslabel
			statusLabel.setString("Tile : " + thenode.getNodeText() + " -> " + direction);

			//Animate the tile to slide it
			CGPoint nodePosition = thenode.getPosition();
			CGPoint tempPosition = emptyPosition ;
			CCMoveTo movetile = CCMoveTo.action(0.4f, tempPosition);
			CCSequence movetileSeq = CCSequence.actions(movetile, CCCallFuncN.action(this, "handleWin"));
			thenode.runAction(movetileSeq);
			emptyPosition = nodePosition ;

			//Play a sound
			appcontext = CCDirector.sharedDirector().getActivity();
			SoundEngine.sharedEngine().playEffect(appcontext, R.raw.tileclick);
			thenode.runAction(movetileSeq);
		}else{
		}

	}
In the above code, we update the moveslabel with the number of moves label, update the status label with the tile details on the tile movement, we perform the slide animation and we play a sound. For the sound, you will need to create a folder inside your “res” folder and name it “raw”. Now place your mp3 sound file within the res/raw folder. You can download the tileclick.mp3 file here
.
At this point, your should have a slider puzzle that works really well and looks like this
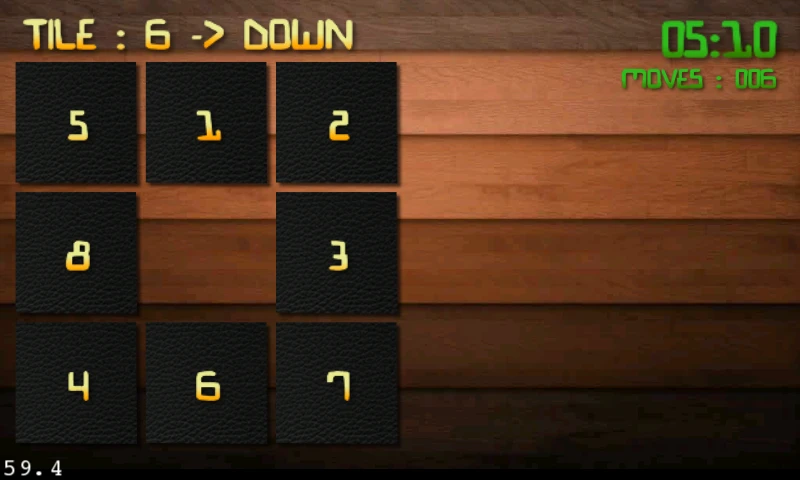
Note: Our puzzle cant tell yet when the player has correctly arranged the tiles. We need to write a method to check the state of the game each time a slide action is done. We have referenced this method “handleWin” in this line.
CCSequence movetileSeq = CCSequence.actions(movetile, CCCallFuncN.action(this, "handleWin"));
Handling the win situation will be done in the next tutorial.
Update! Part 3 of Tutorial Available – Adding A Win Condition for your game
Next Steps
There are a few things you can do to improve the puzzle game
- Create more rows and columns in your puzzle ?
- Enable automatic generation of tiles and write code to generate a sequence of solvable tiles. You can start with examining this code .
- Convert this into a letter puzzle ?
- Raise the bar and push this up into a picture puzzle ?
- Implement a win situation by tracking when the user has correctly solved the puzzle and trigger a game-over callback.
- Manage your audio better . Give users a change to enable or disable sound within the game . Play some background music to give context to you game experience. Link the sound volume levels to the hardware sound buttons on your android device.
- Implement achievements, a leader-board and connect the app with gaming sdks such as scooreloop ?
To get more inspiration, check out gidigames [now FULLY Open Sourced], which contains a similar puzzle with a few extra bells and whistles
Gimme that Code!
Following the tutorial step by step might have been a little daunting, with some errors popping up. You can download the full code (bug free) we have written through a github repo that can be found here . Good luck and Godspeed in your Cocos2D for android journey!
Update! Part 3 of Tutorial Available – Adding A Win Condition for your game