

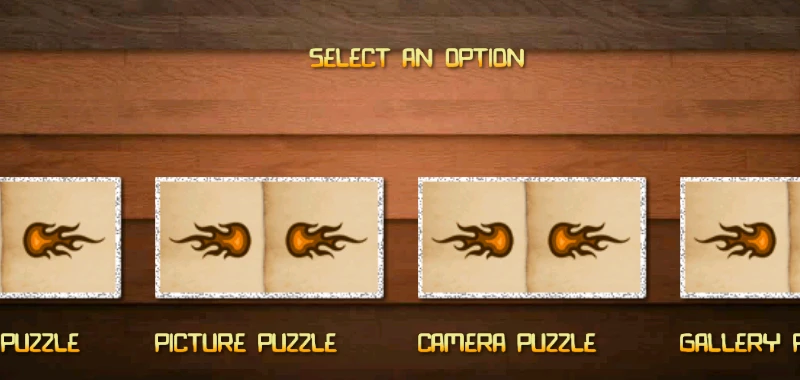
In this tutorial, we use the CCScrollView class to create a horizontal scrolling menu . A scrolling menu is excellent for tastefully laying out the menu items in your games . Items may scroll horizontall or vertically (your call) with that smooth scrolling and snapping effect e.g the one seen in “Cut the rope” when you select the an unlocked game episode. As usual we build on concepts discussed in earlier tutorials, and it’s assumed you have reviewed part 1, part 2 and part 3 of building a slider puzzle game using cocos2d for android. If you haven’t, would be great to review them before starting out on this tutorial.
Switch from .jar to cocos2d source files.
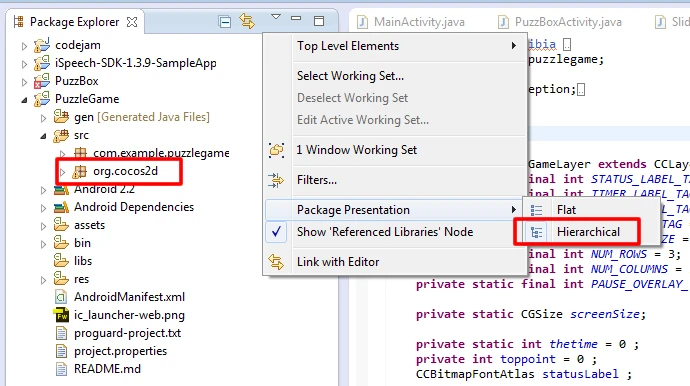
Before we proceed, we have to replace the cocos2d-android.jar with the cocos2d source files. This is because the CCScrollview class is not included in the packaged jar file and appears to have been added more recently to the cocos2d for android github project. The cocos2d source files can be found inside the cocos2d package you already downloaded from github . Copy them and add to your game src folder. Next, delete the cocos2d-android.jar from your project lib folder. If you don’t delete it, you will encounter compile errors as the same classes exist in the added source files and the cocos2d-android.jar file . Also remember to change your folder view to hierarchical for easy viewing in package explorer (Package Explorer > Package Presentation > Hierarchical , as highlighted in the picture below). Your eclipse folder should look like this.
How the ScrollView Class Works
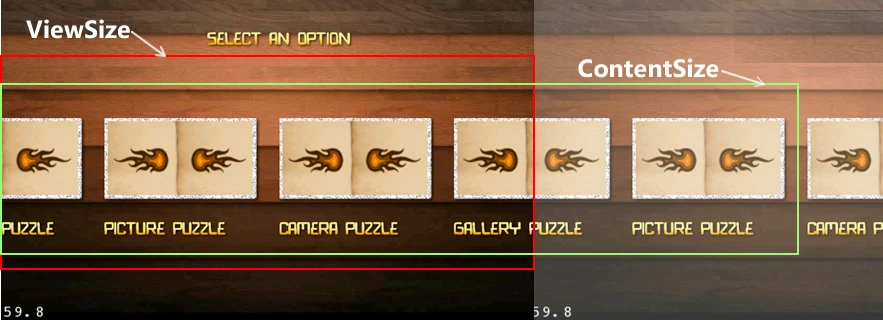
Normally scrolling is needed with the content to be displayed is larger than the available space. Same concept used in browsers 🙂 . For the cocos2d scrollview class two variables are important to implement this smooth scroll effect . First the ViewSize property specifies the size of the window (red highlight in the picture below) and ContentSize is the size of the entire large content (green in the picture below) to be displayed . ContentSize should be greater than ViewSize for the scroll to occur. CCScrollview supports Vertical and Horizontal scrolling .
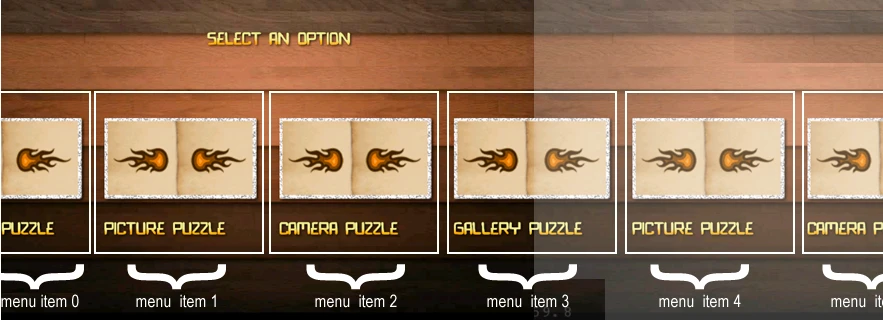
Pretty straightforward. Now the next important part would be to write code that detects which of the menu items we have touched . This is done by listening for touch events and determining which of the menu item areas (white boxes in the image below) it falls into. We override the ccTouchesBegan and ccTouchesEnded method of the CClayer class in getting the touch position and use this in info in conjunction with the knowing the current x position of the content window to determine which menu item was touched.
Lets Write Some Code! – Create the SlidingMenu.java Class and Enable Touches
We create the sliding menu layer as usual and in our default constructor we ensure we enable touches.
public class SlidingMenuLayer extends CCLayer {
private static final int SCROLLVIEW_TAG = 300;
private static CGSize screenSize;
CCScrollView scrollView;
CCBitmapFontAtlas statusLabel ;
private CGPoint startlocation; //keep track of touch starting point
private CGPoint endlocation; ////keep track of touch ending point
float tilescale ;

float generalscalefactor = 0.0f ;

public SlidingMenuLayer () {

this.setIsTouchEnabled(true);
this.setIsKeyEnabled(true) ;
this.isTouchEnabled_ = true ;

// Add our usual background

screenSize = CCDirector.sharedDirector().winSize();
generalscalefactor = CCDirector.sharedDirector().winSize().height / 500 ;

CCSprite background = CCSprite.sprite("background.jpg");
background.setScale(screenSize.width / background.getContentSize().width);
background.setAnchorPoint(CGPoint.ccp(0f,1f)) ;
background.setPosition(CGPoint.ccp(0, screenSize.height));
addChild(background,-5);

}

public static CCScene scene()
{
CCScene scene = CCScene.node();
CCLayer layer = new SlidingMenuLayer();
scene.addChild(layer);
return scene;
}

}
Add Our ScrollView to the Current Layer
We already define our scrollView variable as a field variable in the SlidingMenu class and we add it inside our SlidingMenu default constructor as follows
scrollView = CCScrollView.view(CGSize.zero());
scrollView.bounces = true ; //the bounce effect when a user scrolls to the end
scrollView.setClipToBounds( true) ; //
scrollView.direction =1 ; // for horizontal scrolling.
addChild(scrollView,218, SCROLLVIEW_TAG);
Add Items to the ScrollView
We use a for loop to add a few menu image items (and their text titles) to our scrollView content laying them out horizontally . We also set the contentSize and viewSize variables explained above. This is also added to the default SlidingMenu() default constructor started above
CCSprite tilebox = CCSprite.sprite("picture.png");
// Create our menu ttitles
String[] menutitles = {"number puzzle", "picture puzzle", "camera puzzle" , "gallery puzzle" , "fixed menu" } ;
float newwidth = tilebox.getContentSize().width * 1.5f * generalscalefactor ;
tilescale = 1.5f * generalscalefactor ;

for (int i=0 ; i < menutitles.length ; i++){
//A meu image sprite
tilebox = CCSprite.sprite("picture.png");
tilebox.setAnchorPoint(0.5f, 0.5f);
tilebox.setScale(tilescale);
// Each one is placed with a 30 pixel space from the next ... i *30*generalscalefactor.
tilebox.setPosition(CGPoint.ccp((i*newwidth) + 30*generalscalefactor + i*30*generalscalefactor , screenSize.height/2 - ((tilebox.getContentSize().height *tilescale)/2.0f) ));
//a text title added below each menu image with same x cordinates
CCBitmapFontAtlas nlabel = CCBitmapFontAtlas.bitmapFontAtlas(menutitles[i], "bionic.fnt");
nlabel.setScale(0.8f * generalscalefactor);
nlabel.setPosition(CGPoint.ccp((i*newwidth) + 30*generalscalefactor + i*30*generalscalefactor , tilebox.getPosition().y - ((tilebox.getContentSize().height *tilescale)/2.0f) + 10*generalscalefactor));
scrollView.addChild(tilebox,1,i);
scrollView.addChild(nlabel);
}
// You need to set contentSize to enable scrolling.
// The scrollview is like a sliding window that shows portions of a long list
//View Size is the size of the window and Content size is the size of the entire long list
// For scrolling to occur, the content lenght must be greater than the viewsize
// Thus you must set both content and view size.

scrollView.setViewSize(CGSize.make(screenSize.width, screenSize.height ));
scrollView.setContentSize(CGSize.make(newwidth* (menutitles.length + 1), screenSize.height ));
Handle the Touch Events when a Menu Item is Clicked
We override the ccTouchesEnded method and detect which of the menu items has been clicked. And we launch some event when that occurs using the launchmenu() method.
@Override
public boolean ccTouchesEnded(MotionEvent event)
{
CGRect spritePos ;
endlocation = CCDirector.sharedDirector().convertToGL(CGPoint.ccp(event.getX(), event.getY()));

if (Math.abs(startlocation.x - endlocation.x) < 5){

//Obtain a reference to the scrollview control
CCScrollView tilesNode = (CCScrollView)getChildByTag(SCROLLVIEW_TAG) ;

//Get scrollview children .. its inside container variable
CCClipNode container = (CCClipNode)(tilesNode.getChildren().get(0)) ;

//Iterate through its children ... nlabel and tilebox sprite
// we divide by two here because we have two items added for each menu item
for (int i = 0 ; i < ((container.getChildren().size())/2) ; i++){

// In order to get the position of the item menu that has been touched we note the following
// We need the current position of the touch event ... which is endlocation .. check
// We need to know where it falls into the content
// Since we are scrolling horizontally we add the content current x position to our touch x position
//and construct a rectangle in that area . You can inspect these values using ccMacros.CCLOG.
CCSprite backsprite = (CCSprite)container.getChildByTag(i);
spritePos = CGRect.make(
(backsprite.getPosition().x + container.getPosition().x ) ,
backsprite.getPosition().y ,
backsprite.getContentSize().width*tilescale ,
backsprite.getContentSize().height*tilescale );
if(spritePos.contains(endlocation.x, endlocation.y)){

//Use cccMacro to log information to logcat to to LogCat
ccMacros.CCLOG("Tile " + i + " has been touched : ", "Began touched : " + i);
//Launch the appropriate menu when its toucheds
launchmenu(i);
}
}

}
return true ;
}
Launch Menu Event
Launch some new layer when a menu is clicked.
private void launchmenu( int i){
if (i == 0){
CCScene scene = GameLayer.scene(); //
CCDirector.sharedDirector().runWithScene(scene);
}else if (i == 1){
try {
PictureGameLayer.getBitmapFromAsset("benin.jpg");
} catch (IOException e) {
// TODO Auto-generated catch block
e.printStackTrace();
}
CCScene scene = PictureGameLayer.scene(); //
CCDirector.sharedDirector().runWithScene(scene);
}
else if (i == 2){
PictureGameLayer.getBitMapfromCamera();
}
else if (i == 3){
PictureGameLayer.getBitMapFromGallery();;
}
else if (i == 4){
CCScene scene = MenuLayer.scene(); //
CCDirector.sharedDirector().runWithScene(scene);
}
}
Gimme that updated code
The PuzzleGame code on github has been updated to add the menu item. You may update your clone .
 How to Slide a Sprite around based on touch/drag input in Cocos2D for Android
 Step by Step Guide on How to build your first Slider Puzzle game in Cocos2d for Android – Part 1
 Step by Step Guide on How to build your first Slider Puzzle game in Cocos2d for Android – Part 2
 Setting up Cocos2D for Android, in Eclipse