

In the previous post about setting up cocos2d for android game development, I showed you how to import the cocos2d project into Eclipse and run the sample code included to give an idea of the capabilities/affordances of the Cocos2d game engine.
Before you proceed , would help if you understood The Anatomy of a Cocos2D for Android Game , and got some inkling on how to go about becoming a better programmer .
In this post we will be going through a step by step guide on how to develop a simple game from scratch – a Number slider puzzle game. The game logic is simple. We will offer players a scattered 3X3 matrix slider puzzle and their task is to correctly rearrange the numbers in order of increasing magnitude. We also keep track of the amount of time used to complete task. Lets get started!
Note : I know a few people have less time to go through the entire tutorial or preferentially learn by doing … so here a link to the github repository that contains the complete code from this tutorial series . Feel free to download, use, modify and even contribute updates . Good luck and Godspeed in your Cocos2D for android journey!
Create a New Project and Import the Cocos2D
- You must have downloaded the Cocos2D library already to your machine … if not please checkout the previous post on how to dowload Cocos2D and run the sample applications that come with it!
- Create a new Android Application Project – PuzzleGame
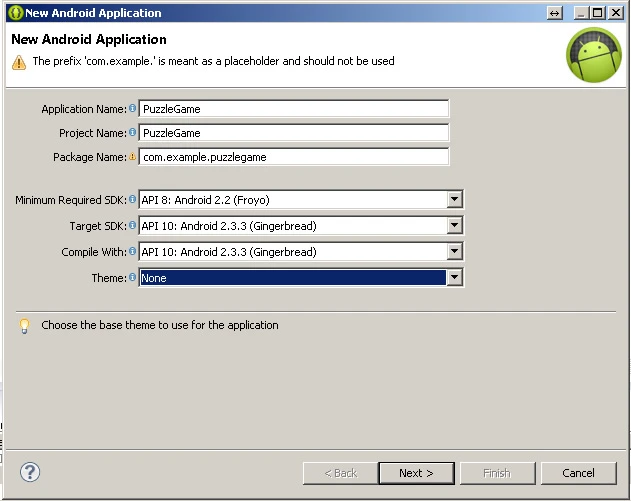 You may click Next, Next Button. On the create Activity Prompt, select Blank Activity and finish.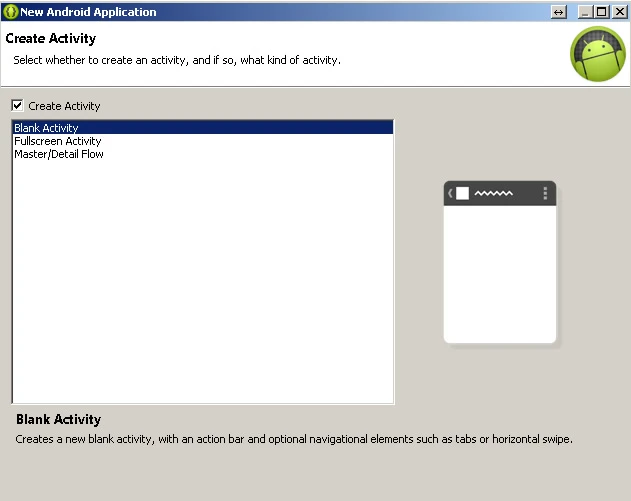
- There are two ways to import the Cocos2d libraries into your PuzzleGame project.
- First, you may simply copy the cocos2d-android.jar file to the libs folder within your project. If this folder does not exist, you may create it.
You can find the cocos2d-android.jar file in the downloaded cocos2d source (cocos2d-master.zip\cocos2d-master\cocos2d-android\libs) from github .Next, you must notify the compiler about the existence of this library by adding it to the build path. To do thatRight Click on your project > Properties > Resource > Java Build Path > Libraries > Add JARS ..Navigate to the libs folder in your project and select cocos2d-android.jar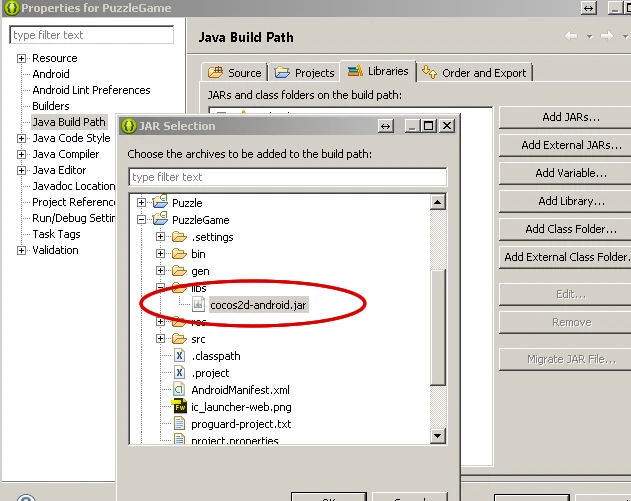
- You can copy the entire src folder in the cocos2d-master zip file (cocos2d-master.zip\cocos2d-master\cocos2d-android\src) into your own PuzzleGame project src folder.
We will be using Method A above for this tutorial because there are less files to manage. However, as you develop more complex projects, you might want to work directly with the main cocos2d source files.
- First, you may simply copy the cocos2d-android.jar file to the libs folder within your project. If this folder does not exist, you may create it.
- Next, copy the fps_images.png file to your PuzzleGame project assets folder. You can find the file in the cocos2d-master zip file you downloaded.
cocos2d-master\cocos2d-android\assets
See Also : How to Create a Sliding Menu in Cocos2d for Android
Lets Start Writing the Main Code
We begin by modifying the default activity (MainActivity.java) . At the top of your class, add the following field:
protected CCGLSurfaceView _glSurfaceView;
Eclipse might flag this as an error – could not resolve type. This is because the type “CCGLSurfaceView” has not been imported. You can fix this by pressing Ctrl + Shift + O . Or hovering over the error and clicking “import CCGLSurfaceView”. You may use this to solve other similar errors. Next, replace the OnCreate Method with the following
@Override
public void onCreate(Bundle savedInstanceState)
{
super.onCreate(savedInstanceState);

requestWindowFeature(Window.FEATURE_NO_TITLE);
getWindow().setFlags(WindowManager.LayoutParams.FLAG_FULLSCREEN, WindowManager.LayoutParams.FLAG_FULLSCREEN);
getWindow().setFlags(WindowManager.LayoutParams.FLAG_KEEP_SCREEN_ON, WindowManager.LayoutParams.FLAG_KEEP_SCREEN_ON);
_glSurfaceView = new CCGLSurfaceView(this);
setContentView(_glSurfaceView);
}
Above snippet sets up the OpenGL surface for Cocos2D , sets some flags to ensure fullscreen and attaches the OpenGL surface to the current application screen. Next, we further extend the onCreate as follows :
@Override
public void onCreate(Bundle savedInstanceState)
{
super.onCreate(savedInstanceState);

requestWindowFeature(Window.FEATURE_NO_TITLE);
getWindow().setFlags(WindowManager.LayoutParams.FLAG_FULLSCREEN, WindowManager.LayoutParams.FLAG_FULLSCREEN);
getWindow().setFlags(WindowManager.LayoutParams.FLAG_KEEP_SCREEN_ON, WindowManager.LayoutParams.FLAG_KEEP_SCREEN_ON);
_glSurfaceView = new CCGLSurfaceView(this);
setContentView(_glSurfaceView);

//
CCDirector director = CCDirector.sharedDirector();
 director.attachInView(_glSurfaceView);
 director.setDeviceOrientation(CCDirector.kCCDeviceOrientationLandscapeLeft); // set orientation
 CCDirector.sharedDirector().setDisplayFPS(true);  //display fps
CCDirector.sharedDirector().setAnimationInterval(1.0f / 60.0f);  //set frame rate

}
The added snippet tells Cocos2D which surface to render, set the screen orientation to landscape left, to display the current FPS rate and set animation interval to 60fps. The actual framerate achieved depends on the capabilities of the device. Next, add the following snippets to instruct Cocos2D on what to do when the device changes state – e.g when the application is terminated or paused or switched.
 @Override
public void onPause()
{
super.onPause();
CCDirector.sharedDirector().pause();
}

@Override
public void onResume()
{
super.onResume();
CCDirector.sharedDirector().resume();
}

@Override
public void onStop()
{
super.onStop();
CCDirector.sharedDirector().end();
}
Cocos2d has now been setup! You should be able to run the application now, although it will be empty. Next, we will work on adding a game layer, game logic and adding the graphics/tiles ! Excited ? Lets go!
Create a New Game Layer
Create a new Class . File > New > Class
Name your class GameLayer and Uncheck the public static void main(String[] args) option and Click OK. Eclipse will generate a some class code for you with a default constructor. Now, your class should extend the Cocos2D Layer class, so you add the extends CCLayer keyword to your class.
Next add the following static method
public static CCScene scene()
{
CCScene scene = CCScene.node();
CCLayer layer = new GameLayer();
scene.addChild(layer);
return scene;
}
The method above creates a scene on which we can add our items. Your GameLayer class should now look like this . (Remember to use Ctrl + Shift + O) to solve type resolution errors.
package com.example.puzzlegame;

import org.cocos2d.layers.CCLayer;
import org.cocos2d.layers.CCScene;

public class GameLayer extends CCLayer {

	public GameLayer () {
		// TODO Auto-generated constructor stub
	}

	public static CCScene scene()
	{
		CCScene scene = CCScene.node();
		CCLayer layer = new GameLayer();
		scene.addChild(layer);
		return scene;
	}
}
Positioning in Cocos2D
Game development does require some simple but very interesting mathematics especially when figuring out the best way to position and scale you images to look good on device screens. Cocos2D uses an inverted cordinate positioning system where each point on the screen is described by its X and Y plane (x,y) distance from the bottom left of the screen . The bottom left is described as cordinate (0,0) and the x value increases as you move right and y value increases as you move up the screen.
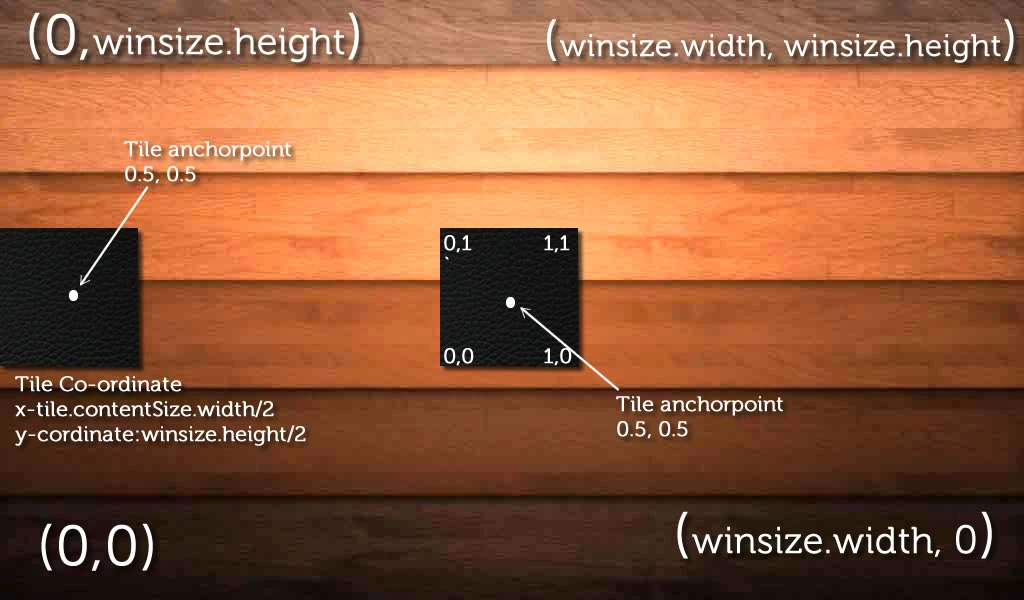
For this game tutorial we will be using the following image assets which I have designed .
background.jpg , tile.png , tile2.png, cancel.png (cancel.png originally sourced from iconfinder.com) . You may download them now, and add them to the assets folder of your puzzleGame project. We will be using a few other image assets which will be introduced later!
Adding a Sprite and Text Labels .
Sprites are pieces of 2D graphics (images) that can be animated on screen. Typically the images we will be working with on this slider puzzle game will be implemented using Cocos2D sprite class. First, lets add our game background and a sample tile.
Add the following field to your GameLayer class to store the device screenSize
private static CGSize screenSize;
Add the following code to your default constructor.
screenSize = CCDirector.sharedDirector().winSize();
generalscalefactor  = CCDirector.sharedDirector().winSize().height / 500 ;
CCSprite background = CCSprite.sprite("background.jpg");
background.setScale(screenSize.width / background.getContentSize().width);
background.setAnchorPoint(CGPoint.ccp(0f,1f)) ;
background.setPosition(CGPoint.ccp(0, screenSize.height));
addChild(background,-5);
Scaling in Cocos2D
While adding images and positioning objects you must also pay attention to scaling issues that arise when your game is run on devices of different resolutions. For example, our background image from the previous tutorial has a dimension of 1024 by 600. On an android device with a resolution different (smaller or larger than 1024 by 600), the image would look quite different – either too large or too small. To avoid this, we usually calculate some appropriate scale factor – a floating point value which we use to scale (expand or shrink) our image to fit the screen . In our code above we have calculated a general scale factor
generalscalefactor = CCDirector.sharedDirector().winSize().height / 500 ;
We will use this scale factor when scaling all our sprites added to the canvas to ensure it scales properly on devices of different screensize. We also set the scale factor value of the background sprite to a mathematical calculation that ensures it is scaled such that its width becomes the width of the device. Next we set our anchorpoint to the topleft (0,1) and also use similar positioning to set the sprites position to the topleft (0, screenSize.height) . We then add the background sprite to the scene using a z-index of -5. This means every other sprite added with a value larger than -5 will be on “top” of the background!
Soo .. just before we run this and admire the pretty work thus far, you should inform Cocos2D to run the new GameLayer class. Go back to MainActivity.java and add the following to the end of the onCreate Method
 CCScene scene = GameLayer.scene(); //
CCDirector.sharedDirector().runWithScene(scene);
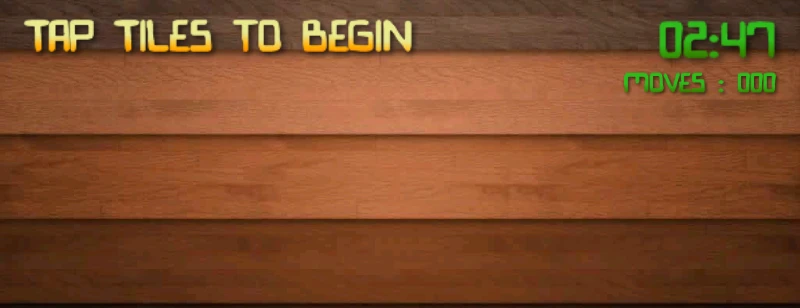
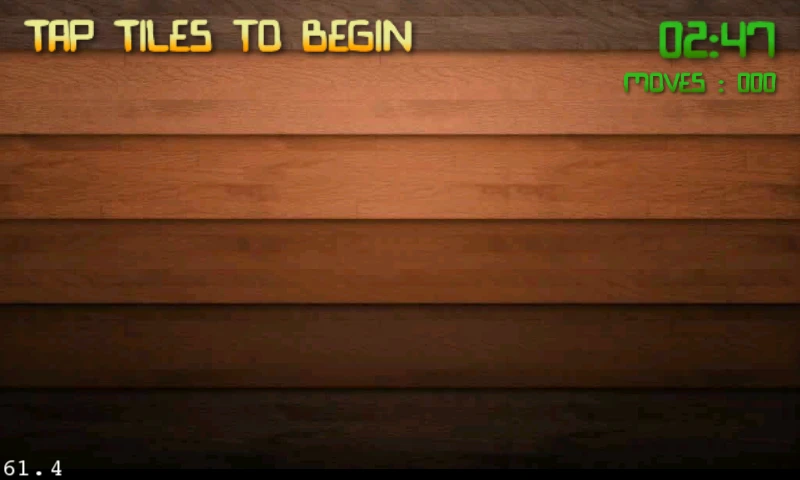
Now run! You should see your background, and your fps dynamic rates showing on screen. Congratulations on coming this far! Lets add a label to the top that shows game status to the user using the Cocos2d CCBitmapFontAtlas class. The CCBitmapFontAtlas class takes two arguments – the string you want to display and the font you want to use. You can create some exciting fonts for your game using the BMFont Generator tool by AngelCode . For this tutorial you may download the following two files and add to your assets folder bionic.fnt and bionic_0.png . Add the following to GameLayer.java at the bottom of the GameLayer default constructor.
// Add Game Status Label
CCBitmapFontAtlas statusLabel = CCBitmapFontAtlas.bitmapFontAtlas ("Tap Tiles to Begin", "bionic.fnt");
statusLabel.setScale(1.3f* generalscalefactor); //scaled
statusLabel.setAnchorPoint(CGPoint.ccp(0,1));
statusLabel.setPosition( CGPoint.ccp( 25* generalscalefactor , screenSize.height - 10* generalscalefactor));
addChild(statusLabel,-2, STATUS_LABEL_TAG);
Of course, Eclipse will complain (cannot be resolved to a variable.). You create this variable easily in eclipse by simply hovering over the error and clicking “Create constant STATUS_LABEL_TAG . Don’t forget to assign it a unique value. This constant is used as a tag for the sprite. We can use this tag value to reference it in the future.
private static final int STATUS_LABEL_TAG = 20;
Similarly, we add two more labels to display time and also to display number of moves.
// Add Timer Label to track time
CCBitmapFontAtlas timerLabel = CCBitmapFontAtlas.bitmapFontAtlas ("00:00", "bionic.fnt");
timerLabel.setScale(1.5f* generalscalefactor);
timerLabel.setAnchorPoint(1f,1f);
timerLabel.setColor(ccColor3B.ccc3(50, 205, 50));
timerLabel.setPosition(CGPoint.ccp(screenSize.width - 25* generalscalefactor , screenSize.height - 10* generalscalefactor ));
addChild(timerLabel,-2,TIMER_LABEL_TAG);

// Add Moves Label to track number of moves
CCBitmapFontAtlas movesLabel = CCBitmapFontAtlas.bitmapFontAtlas ("Moves : 000", "bionic.fnt");
movesLabel.setScale(0.8f* generalscalefactor);
movesLabel.setAnchorPoint(1f,0f);
movesLabel.setColor(ccColor3B.ccc3(50, 205, 50));
movesLabel.setPosition(CGPoint.ccp(screenSize.width - 25* generalscalefactor, timerLabel.getPosition().y - timerLabel.getContentSize().height* generalscalefactor - 10* generalscalefactor - timerLabel.getContentSize().height* generalscalefactor));
addChild(movesLabel,-2,MOVES_LABEL_TAG);
We have used the ..setColor(ccColor3B.ccc3(50, 205, 50)); method to change the color of the label. The value (50, 205, 50) is RGB equivalent of any color and you can get that from Colorpicker.com .
Now .. we have the timer label .. lets write some code to make it start ticking! Cocos2D provides a schedule function to run repeated activities and takes an argument for the repeat interval. Let create the method which the schedule function will run. Create it outside your default constructor but inside the GameLayer class . The schedule function will run this method every one second.
public void updateTimeLabel(float dt) {

thetime += 1;
String string = CCFormatter.format("%02d:%02d", (int)(thetime /60) , (int)thetime % 60 );
CCBitmapFontAtlas timerLabel = (CCBitmapFontAtlas) getChildByTag(TIMER_LABEL_TAG) ;
timerLabel.setString(string);

}
In the code above we first increment the time value by 1, then we format its value to be displayed in time format (90 seconds becomes 1:30). Remember the tag we set on the timerLabel, we then use this tag to reference the label and set its string content.
Ofcourse, remember to create an integer field variable (thetime) in your class to save the time digits .
private static int thetime = 0 ;
Now we add the following code to the bottom of the default constructor to run the schedule function
schedule("updateTimeLabel", 1.0f);
At this point .. your game should be coming on nicely .. You should see your timer counting .. ticking away gently! Congratulations.
Whats Next ?
Next .. Part 2 of this tutorial .. game logic and adding tiles .. coming soon!!! Let me know how the first part went in the comment section!
Update : View Part 2 of the Tutorial Here
style=”display:inline-block;width:728px;height:90px”
data-ad-client=”ca-pub-5103730469785618″
data-ad-slot=”7988038888″>



Pingback: Setting up Cocos2D for Android, in Eclipse | Denvycom()
Pingback: How to Slide a Sprite around based on touch/drag input in Cocos2D for Android | Denvycom()
Pingback: Adding a Game Menu in Cocos2D for Android | Denvycom()