

In Part 1 of this tutorial series, you learned about creating a new Cocos2D for android project, adding sprites, scaling and positioning sprites. In Part 2, you learned more about generating and positioning the tiles for the slider puzzle, and catching/interpreting user’s touch response. In this final part, we will look at final code to check if the player has successfully solved the puzzle .
Checking for a Solved State
Basically, each time the player slides a tile, we inspect the game to check if the arrangement is correct. Our handleWin method is listed as a callback in the code that animates each slide from tutorial Part 2. If not correctly positioned , we proceed with allowing more slides , else we show a message indicating success. Our method WinCallback is fired if the tiles are in a correctly solved position.
public void handleWin(Object sender){
if(checkCorrect()){
//gameover = true ;
SoundEngine.sharedEngine().playEffect(appcontext, R.raw.tileclick);
WinCallback(sender);

}
Again here, we leverage our knowledge of the physical position of each tile on the screen in ascertainig a correctly solved game. On the first row, the square in the topmost left, we expect tile 1 to be there, and next to it tile 2 and 3. In the second row, we expect tile 4, 5 and 6. Finally on our last row we expect tile 6 and 7 followed by the empty tile space. This is our winning or correct condition. We use a loop to go through each row and each column and if we have a condition where the expected tile is not found at a position , bingo .. we return false. Else the player solved the puzzle.
//This method checks if the puzzle has been correctly solved.
	public boolean checkCorrect(){
		CCNode tileNode = (CCNode) getChildByTag(TILE_NODE_TAG);
		int nodeindex = 1 ;
		boolean result = false;

		for (float j = toppoint ; j > toppoint - (TILE_SQUARE_SIZE * NUM_ROWS); j-= TILE_SQUARE_SIZE){
			for (float i = topleft ; i < (topleft - 5) + (TILE_SQUARE_SIZE * NUM_COLUMNS); i+= TILE_SQUARE_SIZE){
				if(tileNode.getChildByTag(nodeindex).getPosition().x == i && tileNode.getChildByTag(nodeindex).getPosition().y == j ){
					result = true ;
				}else{
					return false ;
				}
				nodeindex++ ;
				if(nodeindex == (NUM_ROWS * NUM_COLUMNS)){
					return result ;
				}
			}

			//rowindex++ ;
		}

		return result ;
Sleek “Pop Up” / Transparent Overlay for Notifications
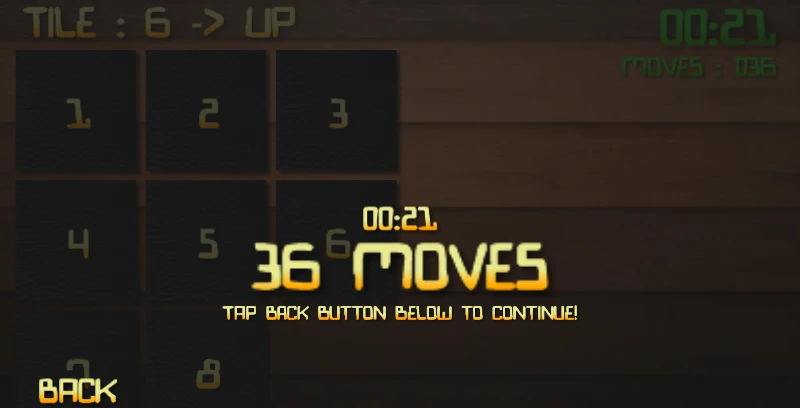
Next, we provide some notification to the user who has won. This is done using the WinCallback method. I have included some cool animations to make the game little sleek. First a transparent overlay is added to the screen. Its basically a CCColorLayer with stuff some color transparency.
unschedule("updateTimeLabel"); // stop the timer

		//Create a dark semi-transparent layer called pauseOverlay and add over our scene
		CCColorLayer pauseOverlay = CCColorLayer.node(ccColor4B.ccc4(25, 25, 25, 255));
		pauseOverlay.setOpacity(200);
		pauseOverlay.setIsTouchEnabled(true);
		addChild(pauseOverlay,200,PAUSE_OVERLAY_TAG);

		//Show the number of moves in a label called movesLabel
		CCBitmapFontAtlas gamemoves = CCBitmapFontAtlas.bitmapFontAtlas ( CCFormatter.format("%02d", moves ) + " Moves", "bionic.fnt");
		gamemoves.setAnchorPoint(CGPoint.ccp(0,1));
		gamemoves.setScale(generalscalefactor);
		gamemoves.setAnchorPoint(0.5f,1f);

		//Annimate the moves label a little .. scale it
		gamemoves.setPosition(CGPoint.ccp(screenSize.width / 2.0f , screenSize.height/2.0f ));
		pauseOverlay.addChild(gamemoves,300 );
		gamemoves.runAction(CCSequence.actions(
				CCDelayTime.action(0.5f),
				CCScaleBy.action(0.2f, 2.0f)
				));

		//Some instruction for the user to procee
		CCBitmapFontAtlas instructionFontAtlas = CCBitmapFontAtlas.bitmapFontAtlas( "TAP Back button below to continue!" , "bionic.fnt");
		instructionFontAtlas.setPosition(gamemoves.getPosition().x, -instructionFontAtlas.getContentSize().height*0.6f*generalscalefactor) ;
		instructionFontAtlas.setScale(0.6f*generalscalefactor) ;
		pauseOverlay.addChild(instructionFontAtlas,301);

		//animate the instruction label a little ... moveTo
		instructionFontAtlas.runAction(CCSequence.actions(
				CCDelayTime.action(0.5f),
				CCMoveTo.action(0.5f, CGPoint.make(gamemoves.getPosition().x, gamemoves.getPosition().y - 10*generalscalefactor - gamemoves.getContentSize().height *generalscalefactor * 2.0f))
				));

		//Show amount of time in a lable
		CCBitmapFontAtlas gametime = CCBitmapFontAtlas.bitmapFontAtlas (CCFormatter.format("%02d:%02d", (int)(thetime /60) , (int)thetime % 60 ), "bionic.fnt");
		gametime.setAnchorPoint(CGPoint.ccp(0,1));
		gametime.setScale(generalscalefactor);
		gametime.setAnchorPoint(0.5f,1f);
		gametime.setPosition(CGPoint.ccp(screenSize.width / 2.0f , gamemoves.getPosition().y + gamemoves.getContentSize().height*generalscalefactor/2.0f + 10 ));
		pauseOverlay.addChild(gametime,301);

		//reset time to zero

		CCBitmapFontAtlas label = CCBitmapFontAtlas.bitmapFontAtlas("BACK", "bionic.fnt");
		CCMenuItemLabel item5 = CCMenuItemLabel.item(label, this, "backCallback");

		CCMenu resumemenu = CCMenu.menu(item5);
		resumemenu.setPosition(CGPoint.make(label.getContentSize().width, label.getContentSize().width));
		pauseOverlay.addChild(resumemenu,800) ;
Our back button is linked to a final callback method where we remove the overlay and reset the game by reloading the game scene.
schedule("updateTimeLabel"); //restart timer
		moves = 0 ; //Reset moves
		thetime = 0 ; //Reset time

		//Remove the pause layer and reload the scene
		CCColorLayer pauselayer = (CCColorLayer) getChildByTag(PAUSE_OVERLAY_TAG) ;
		pauselayer.runAction(CCMoveTo.action(0.2f, CGPoint.make(screenSize.width / 2.0f, screenSize.height + pauselayer.getContentSize().height*generalscalefactor)));

		pauselayer.removeAllChildren(true);
		pauselayer.removeSelf() ;
		CCDirector.sharedDirector().replaceScene(GameLayer.scene());
Next Steps
There are a still few things you can do to improve the puzzle game
- Create more rows and columns in your puzzle ?
- Enable automatic generation of tiles and write code to generate a sequence of solvable tiles.
- Convert this into a letter puzzle ?
- Raise the bar and push this up into a picture puzzle ?
- Manage your audio better . Give users a change to enable or disable sound within the game . Play some background music to give context to you game experience. Link the sound volume levels to the hardware sound buttons on your android device.
- Implement achievements, a leader-board and connect the app with gaming sdks such as scooreloop ?
To get more inspiration, check out gidigames, and puzzbox Africa which contains a similar puzzle with a few extra bells and whistles.
Gimme that Code!
Following the tutorial step by step might have been a little daunting, with some errors popping up. You can download the full code (bug free) we have written through a github repo that can be found here . Good luck and Godspeed in your Cocos2D for android journey!
Updates :
New posts on
Handling Sound in Cocos2D
How to build a game menu in Cocos2D
How to build a Slider Puzzle in Cocos2D
Gidigames has been made open source
 Step by Step Guide on How to build your first Slider Puzzle game in Cocos2d for Android – Part 2
 Step by Step Guide on How to build your first Slider Puzzle game in Cocos2d for Android – Part 1
 How to Slide a Sprite around based on touch/drag input in Cocos2D for Android
 Game Development Using Cocos2d on Android – An Introduction