
The irblaster included in the Gear 2 is definitely an innovative component especially for hobbyists and developers. Several Arduino projects have excitedly explored projects that let them build custom remote controllers for electronic devices that have infra red receivers such as digital cameras, tv’s, air-conditioners , cd player systems, DSLR cameras etc.
Now imagine being able to write code to do that from your wristwatch (gear 2). Fortunately, this is supported with both the Gear 2 and Gear 2 neo as they both have the irblaster hardware . In this post we’ll be looking at code to control the gear 2 IR sensor, send string data and what these mean.
How does Infrared Communication Work ?
To send information via infrared, you need a modulation frequency, and a communication protocol. The communication protocol refers to a series of pulse signals which are layered on a carrier signal transmitted at a modulation frequency. There are different types of transmission formats (Manchester coding, pulse distance coding and pulse length coding) but we will be focusing on pulse length coding which is the format used in most IR devices I have seen. Think of it this way. Imagine you have a Philips tv remote control. Each time you press a button, and infrared signal is transmitted . The transmission is made up of a 36Hz signal turned off and on in a given unique pattern (protocol) for each different button. It resembles a square wave form. When the signal is high, a 36 Hz IR signal is transmitted and when the signal is low , nothing is transmitted.
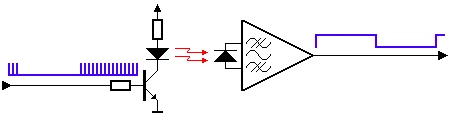
Now, the protocol data is regulated by how long (the pulse length) the on signal is transmitted and how long the off signal is transmitted. E.g to transmit a stop signal the remote may start with a 3000 millisecond on followed by 500 millisecond off, 1200 ms on , 600 off …. etc. To learn more about remote signals , this article is useful .
Getting this done with the Gear 2 IrBlaster
There is some sample code in the tizen wearable help documentation to begin with. The more important part is figuring out what the code means …
// power on control data
	var data = "38400,174,172,24,61,24,62,24,61,24,17,25,17,24,17,24,17,24,18,24,61,24,62,24,61,24,18,24,17,24,17,24,18,24,17,24,17,24,62,24,17,24,17,24,18,24,17,24,17,24,18,24,61,24,17,24,62,24,61,25,61,24,62,24,61,24,62,24,1879";
	webapis.irled.send(
			data,
			function() {
				console.log("data send ok");
			},
			function(e) {
				console.log("Error: " + e.message);
			});
The most important part here has to do with the data variable.
As inferred from this thread on XDA, the first value indicates the modulation frequency. – 38400. Next value is the width of the next pulse to be sent – 174, followed by another pulse with width 172, 24, …. till 1879 .
To transmit other kinds of signals more work has to be done. First you will need to discover the right modulation frequency, and then the series of protocol codes . Most times these codes are in hex and need translating to dec values . I’ll update the post when I get a better hang of that. In the mean time, hope this article has been a starting point for you, and feel free to share what worked for you and didn’t.
Finally, remember to add the irled priviledge to your config.xml file.
<tizen:privilege name=”http://developer.samsung.com/privilege/irled”/>
Note: From the Api document
It is recommended to design feature related code in a modular way.To guarantee the running of this application on a device with IrLed feature, define the following requirements in the config file:
- http://developer.samsung.com/tizen/feature/irled
![Getting Accelerometer Data in Javascript for your Gear 2 Apps [Sample Code]](/blog/wp-content/uploads/2014/06/DSC_0010-e1403604089758-150x150.webp)